Quantcast
Showing posts with label nail diy. Show all posts

Wednesday, July 31, 2013

4 Ways To Try Summer Prints With Nail Art


Summer is my absolute favorite season. Not only for the warm weather, beach days, and picnics but also because bright colors and fun prints are a wardrobe must-have. If you're used to sticking to neutrals during the colder months, bursting onto the summer scene in full-on prints might be a tad intimidating. But don't worry, your wardrobe isn't the only place you can try the trends.

Nail art is an easy way to pull off fashion-forward prints as an accessory to your look. Here are four cool ways to try the print trend the DIY nail art way:

1. Runway-Inspired Nails

This Kenzo-inspired manicure is easily accomplished in four simple steps. If you've seen this print on some of your favorite celebs, I'm sure you've wondered how to get the look for less. This DIY nail art tutorial will show you how. It's high fashion, quick, easy and on the cheap!

2. Modern Art-Inspired Nails

Taking cues from artist Piet Mondrian, this manicure looks way more complicated than it actually is. You can achieve this look in six quick steps. It requires a few different nail colors applied in block strips to achieve the boxed look, and just a little precision with a black nail art brush. Give it a try, especially if you can't afford to have a Mondrian original hanging on your wall. Instant decor for the nails!

3. Chevron Nails

One of the simpler nail art looks that can be easily interchanged with your preferred wardrobe colors, the chevron print is a popular one this season. This tutorial features five super simple steps. It's a bold print, and also fun and easy to do. You can tone it down for more professional setting by using two neutral palette colors. It's a jazzier version of the french mani!

4. Rainbow Nails

By far the most arts & craftsy of the bunch, this style might be best for a fun weekend picnic, a summer festival, or a pool party. You'll undoubtedly stand out with multicolored nails, and the cool thing about this five-step tutorial is that it is super easy to personalize. Pick your three favorite summer colors and have at it!

Would you try any of these bold DIY nail art trends to upgrade your summer wardrobe? Keep me posted!

This post is part of BlogHer's Revamp Your Style editorial series, made possible by Schick Hydro Silk.
Pin It!

Thursday, February 14, 2013

Style Play Polish: Valentine's Day Nails by Get Nailed

Happy Valentine's Day guys! As a special treat for V-day, we have a special edition of Style.Play.Polish guest-edited by Chelsea King of Get Nailed. I'm a huge fan of her nail art blog, so I hope you all show her some love:

Hello everyone, my name is Chelsea and I’m so excited to be guest posting on LoveBrownSugar! I have a nail art blog, Get Nailed, where I post photos and tutorials of all sorts of nail art. Today I’m going to show you how to get a simple but cute Valentine’s Day look for your nails.


What I Used:

First, you’re going to want to paint a base color on all your nails. I used the light pink for my ring finger and used this light brown polish on the rest of my nails.

Once it dries, you’re going to get your pink polish and paint a stripe down the center of your nails. I used the brush directly from the bottle, but if you have a small paintbrush handy that will work as well!

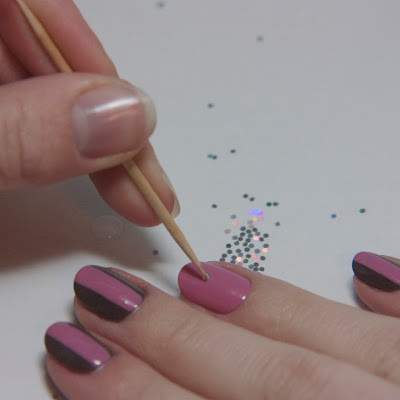
For the ring finger, I used my glitter placement technique to make a heart out of glitter. I also have a video tutorial which you can view here:


I’m using loose glitter, which you can find at many craft stores or online. This particular glitter I got from bornprettystore.com.

You first get your toothpick and dip it in top coat to pick up an individual glitter. You then dip the glitter into the top coat and apply it to your nails. For this design I’m placing the glitters in the shape of a heart. Once you apply all of the glitter, put on your favorite top coat and you are finished!

Thank you Christina and I hope you all enjoyed this post!

Like Chelsea's designs? Find more of her at the links below:

Pin It!

Monday, October 22, 2012

Style Play Polish: OPI Black Spotted Manicure DIY


We've got a new feature on the site y'all! Considering how fanatic we are about nail art, it only made sense that we'd start a nail art tutorial series. Welcome to Style | Play | Polish - get ready to be inspired! Our first tutorial comes courtesy LBS intern Grace. She's gonna show you how to achieve the Limited Edition OPI Black Spotted Top Coat manicure without the actual lacquer (it's only available in France!)

Check it out:


OPI released their Black Spotted Top Coat as part of the Spiderman Collection, exclusively in French Sephora stores, which means this highly sought after polish is being sold and bid on through Ebay for prices an average nail enthusiast would not pay. We're talking well over $40! So what's a girl to do? We put our creativity to the test and came up with a cost efficient way to achieve this look without having to spend a dime.


What you will need:
Step 1: Apply your favorite base coat to protect your nails from the colored coat.

 Step 2: Apply a bright color for contrast.

Step 3: Use an empty polish bottle to apply the oil to your completely dried nails. Using the oil makes it easier to lift the black polish in step 6.

Step 4: Pour the alcohol into the cap and soak the Q-tip.

Step 5: Cover the entire colored surface with the black polish. Don't worry if it clumps up.

Step 6: Use the alcohol soaked Q-tip to create spotted patterns on top of the nail.

Step 7: Seal your creation with a top coat.

In the end, your design should be a replica of what it would actually look like if you used the OPI Black Spotted Top Coat. It's quick, easy, and free!


Would you try this nail trend?

Want to save time and buy the real thing? Get it on Ebay HERE

- Gracie J.
Pin It!